Google Consent Mode V2 for Magento 2
Getting your store ready for the future of privacy: Google Consent Mode v2
What is Google Consent Mode v2?
Google Consent Mode is a mechanism through which your users' Cookie or app identifier consent status is communicated to Google. Google tags will then adjust their behavior and the information they send through based on the consent status.
Consent Mode, upon receiving the communicated consent status, dynamically adapts the behavior of Analytics, Ads (as well as some 3rd-party) tags that create or read browser cookies. This allows Google to use advanced modelling to fill in the gaps when data isn't available, providing you a better and more accurate experience across Google Services.
Why do you need to use Google Consent Mode v2?
Ultimately, it's all about making sure that user privacy choices are respected, however, starting with March 2024, Google has determined Consent Mode v2 to be a requirement for websites that use Google Services in the European Economic Area (EEA). These changes and requirements allow you simultaneously respect privacy choices, while also ensuring Google's conversion and behavioral modelling can substitute the lack of data and continue providing a unified data experience.
How does Google Consent Mode v2 work?
Essentially, Google Consent Mode requires setting a default consent state for a few Google-specific parameters (usually denied) when a user first accesses the website. Afterward, a consent banner or popup is displayed, which allows the user to customize (deny or accept) their consent towards Google's parameters. When the user interacts with the banner, the consent state is updated and communicated to the Google Tag Manager container. The tags in the container then adapt their behavior based on the signals provided. In short, the process is:
- Set up a consent banner
- Set the default consent state (usually denied)
- Update the consent state as the user interacts with your banner
Google does not provide a consent banner/popup that can be used, so the onus is on the merchant to implement this. This can be done via a Cookie Management Platform (which handles the acceptance/rejection of cookies in general) or via a custom functionality through which a banner or popup is displayed. If you already have a Cookie Management Platform/Solution implemented, there's a good chance it's been updated for compatibility with Google Consent Mode v2, in which case you can explore Google's documentation to find out whether Consent Mode is properly implemented.
What does the WeltPixel Google Consent Mode v2 for Magento 2 extension do?
The purpose of this extension is to ensure merchants can implement Google's Consent Mode v2 on their website with minimal effort, friction and customization. Essentially, the module fulfills the implementation by setting a default consent state and allowing merchants to display a form (either via popup or Magento Widget) that users can interact with to update the consent state and communicate this information to Google Tag Manager.
This extension is targeted and intended for merchants that do not have an existing Cookie Management Platform/Solution and that do not intend to implement one. It's important to note that the extension is not a full-fledged Cookie Management Platform and only serves to set and update Google's specific Consent Mode v2 parameters. It works with an existing Google Tag Manager implementation and, for best results, is recommended to be used with our Google Analytics 4 (GA4) extension.
Features of the Extension.
- Ensures website compliance with Google Consent Mode v2.
- Possibility of displaying Consent Form via a traditional Popup or via an insertable widget for increased flexibility.
- Ability to group consent parameters for UX simplicity.
- NEW: Ability to control popup or widget toggle default position to reduce friction and need for customer interaction.
- Custom labels for consent parameter groups.
- Full compatibility with the Google Analytics 4 extension.
HOW TO INSTALL
This extension is installed via Composer, which is the official and only supported installation method.
Step 1: Prerequisites
- Ensure your Magento version is compatible (2.3.0 - 2.4.8 and all Security Patches)
- Install on a testing/development environment first
- Set Magento to developer mode before installation
- Make sure you have Composer installed on your server
php bin/magento deploy:mode:set developer
Step 2: Access Composer Configuration
Head into the Downloadable Products section of your weltpixel.com account. This is where you'll be able to see your Composer Configuration Commands.
You'll need to have Composer installation enabled for your account. If you don't see the Composer Configuration Commands, please contact our support team.
Step 3: Configure Repository
Run the generated commands from your account. Example commands:
composer config repositories.weltpixel composer https://weltpixel.repo.packagist.com/your-id/
composer config --global --auth http-basic.weltpixel.repo.packagist.com token your-token
These commands will provide you access to the WeltPixel repository. Replace 'your-id' and 'your-token' with the actual values from your account.
Step 4: Install via Composer
Run the following command in your Magento root directory:
composer require weltpixel/m2-weltpixel-google-consent-mode-v2
Step 5: Enable and Setup
Run the following commands:
php bin/magento setup:upgrade
php bin/magento setup:di:compile
php bin/magento setup:static-content:deploy -f
Step 6: Cache Management
Flush any caches:
php bin/magento cache:flush
Step 7: Production Mode
If your store was in production mode, switch it back:
php bin/magento deploy:mode:set production
Wooohooo! The extension is now installed on your Magento store! Congrats!
How to Upgrade the Extension
- Step 1: Run: composer update (for the package)
- Step 2: Run setup commands: php bin/magento setup:upgrade, php bin/magento setup:di:compile, php bin/magento setup:static-content:deploy -f
- Step 3: Flush cache: php bin/magento cache:flush
GOOGLE CONSENT MODE V2 FOR MAGENTO 2 EXTENSION SETTINGS.
- Enable Google Consent Mode - Set this option to Yes to enable the Google Consent Mode V2 integration. To use this extension, you'll need a Google Tag Manager integration. The module is designed to work with our Google Analytics 4 extension, but should work fine with other integrations, provided the Google Tag Manager initialization script is loaded after the Google Consent Mode default state is set by this extension.
- Enable Url Passthrough - URL Passthrough ensures information that's passed to your website via URL query parameters is sent to Google in cases in which ad_storage is denied. More details can be found in Google's Consent Mode V2 documentation.
- Default Consent Toggle Position [ Checked / Unchecked ] - Choose whether you want the toggle position to start checked or unchecked. Checked is recommended to reduce friction and the need for customer interaction.
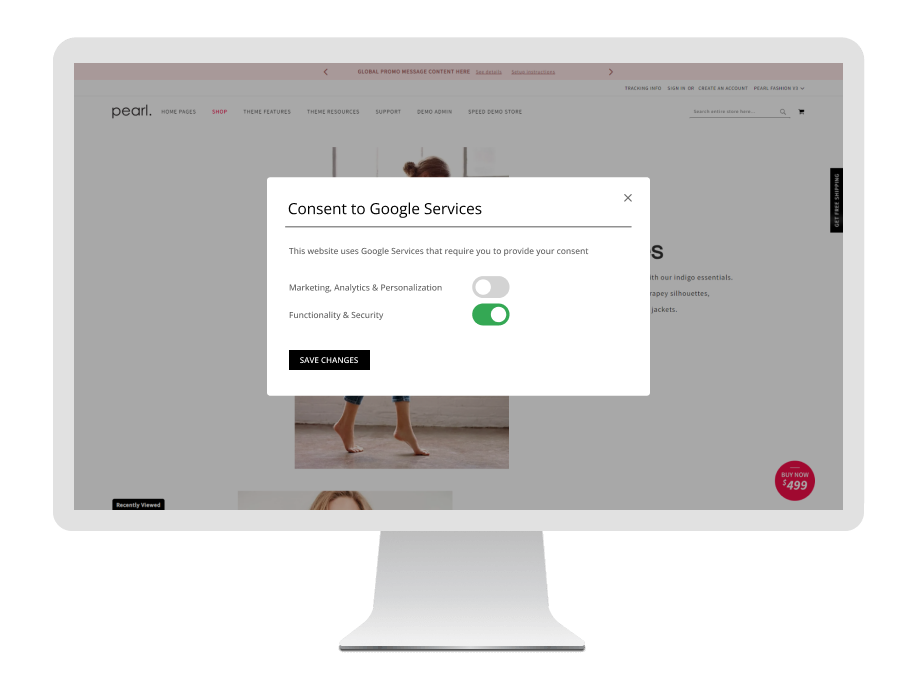
- Display in a popup - Choose whether to display the Google Consent Mode widget in a popup, similar to a Cookie Banner. The popup will be displayed when the user first accesses the store, and can be closed at any time. If the user closes the popup without updating their settings, the default "denied" consent state is used. If you want to offer users the possibility of reopening the popup, you can add the wp-consent-popup-open class to an element that is accessible anywhere on the store, for example, a Footer Link. Once the element is clicked, the popup will reopen and the user can modify their consent settings.


- Popup Heading - Choose the heading text to be displayed on the Google Consent Popup.
- Popup Description - Choose the description text to be displayed on the Google Consent Popup.
- Group Consent States - If set to Yes, the consent states are split into two groups - Marketing, Analytics & Personalization, containing Ad Storage, Ad User Data, Ad Personalization, Analytics Storage, Personalization Storage and Functionality & Security, containing Functionality Storage, Security Storage. The end user will see two toggles on the frontend.
- Marketing, Analytics & Personalization Group Label - Choose the label for the Marketing & Analytics group toggle. If no value is specified, "Marketing, Analytics & Personalization" is used.
- Functionality & Security Group Label - Choose the label for the Personalization & Storage group toggle. If no value is specified, "Functionality & Security" is used.
Change Log.
What's new in v.1.16.0 - January 7, 2026
- Giving back: As a celebration of over 10 years of activity within the Magento 2 ecosystem, and as a way to give back to the community, a number of WeltPixel extensions (both FREE and paid) have officially gone fully Open Source via public Github repositories. Find the full list on Github.
- New Feature: Introduced composer as the official and singular installation method for all WeltPixel products. Previously, this was only available for the PRO version of the Google Analytics 4 extension, as well as the Marketing Suite Pro.
What’s new in v.1.15.9 - October 28, 2025
- Magento Compatibility: Introduced compatibility with the latest released Magento 2 Security Patches - Magento 2.4.8-p3, Magento 2.4.7-p8, Magento 2.4.6-p13, Magento 2.4.5-p15 & Magento 2.4.4-p16.
- New Feature: Added improvements to Magento Admin messaging around Product Updates to ensure visual clarity for users not running the latest product release.
- New Feature: Added .ddev.site and .cloudwaysapps.com as accepted development domains. These domains will no longer require additional license keys.
What’s new in v.1.15.7 - September 2, 2025
- Magento Compatibility: Introduced compatibility with the latest released Magento 2 Security Patches - Magento 2.4.8-p2, Magento 2.4.7-p7, Magento 2.4.6-p12, Magento 2.4.5-p14 & Magento 2.4.4-p15.
- Added additional validations to prevent Magento Admin errors when the Backend extension could not fetch the current server user due to permissions issues.
- Added adjustments to frontend templates to adhere to Magento Best Practices regarding XSS validations.
- Fixed a CSP issue that would sometimes prevent orders from being created via the Magento Admin.
What’s new in v.1.15.3 - June 20, 2025
- Magento Compatibility: Introduced compatibility with the latest Magento 2.4.8-p1, 2.4.7-p6, 2.4.6-p11 & 2.4.5-p13 Security Patches releases. Upgrade ASAP to keep your store secure.
- Fixed the Backend functionality that enables users to change the default Magento CSP Restriction Mode via the Magento Admin. This was broken starting with Magento 2.4.7.
What’s new in v.1.15.0 - April 22, 2025
- Magento Compatibility: Introduced compatibility with the new Magento 2.4.8 release, as well as the accompanying 2.4.7-p5, 2.4.6-p10, 2.4.5-p12 and 2.4.4-p13 Security Patches.
- PHP Compatibility: Introduced compatibilty with PHP 8.4, which is now officially compatible with the latest Magento 2.4.8 version.
- New Feature: Added magento2.docker as a valid domain for development purposes.
- New Feature: Added ddev.site as a valid domain for development purposes.
- Fixed an issue that would prevent certain extension options from correctly applying in Single Store Mode instances.
- Added backend licensing adjustments for compatibility with the Google Analytics & Social Marketing Suite PRO.
What’s new in v.1.14.13 - February 17, 2025
- Magento Compatibility: Introduced compatibility with the newly released Magento 2.4.7-p4, 2.4.6-p9, 2.4.5-p11 and 2.4.4-p12 versions.
- Fixed an issue related to licensing which would prevent license keys from being validated various subdomains.
What’s new in v.1.14.11 - January 15, 2025
- Removed deprecated Magento 2.2.x code version from extension package.
What’s new in v.1.14.9 - November 26, 2024
- Adjusted the script tag the extension uses to ensure its scripts stay in the head section when Move JS to Bottom functionalities are used. The tag now uses a data-attribute.
- Added minor Magento Admin adjustments to the module status section for increased clarity and compatibility with server-side Social Pixel addons.
What’s new in v.1.14.7 - October 11, 2024
- Compatibility: Introduced compatibility with the latest Magento 2.4.7-p3, 2.4.6-p8, 2.4.5-p10 and 2.4.4-p11 versions, which come with critical security adjustments for the platform. Magento 2 merchants are urged to upgrade to the latest patches ASAP.
- Added various code updates for increased security around the licensing functionality as well as the Help Center and WeltPixel Developer Magento Admin sections.
What’s new in v.1.14.3 - June 20, 2024
- Compatibility: Introduced compatibility with the latest Magento 2.4.7-p2, 2.4.6-p7, 2.4.5-p9 and 2.4.4-p10 versions, which come with critical security adjustments for the platform. Magento 2 merchants are urged to upgrade to the latest patches ASAP.
What’s new in v.1.14.1 - April 19, 2024
- Fixed a bug that would sometimes cause the Consent Mode V2 popup to appear on the frontend even when the extension was disabled in the Magento Admin.
- Confirmed compatibility with the latest Magento 2.4.7 release, as well as newly released 2.4.6-p5, 2.4.5-p7 & 2.4.4-p8 Security Patches.
- Confirmed compatibility with PHP 8.3 on the Magento 2.4.7 release. PHP 8.2 is also supported for this Magento version.
- Added security improvements to the Backend module's license verification process.
What’s new in v.1.10.1 - March 28th, 2024
- Initial release.